Build a shop with Next.js and Stripe
This article is part of a series, find the rest of the parts here:Continuing with the Next.js & Stripe online shop series we now will display the products.
We first need to get the products from Stripe and we need to do that securely and not expose our secret Stripe key. So let’s start with creating a new file called products.js in the /pages/api/ folder.
We need to install the stripe NPM package first. Run the following command to install it:
npm install --save stripeAdd the following to the products.js file:
const stripe = require("stripe")(process.env.STRIPE_SECRET_KEY);

export default async function handler(req, res) {
  try {
    const products = await stripe.products.list({
      limit: 100,
    });

    res.status(200).json(products);
  } catch (err) {
    res.status(500).json({ message: err.message });
  }
}
By default the products can only be retrieved on the same origin ensuring that only our own shop can retrieve the products.
Let’s test the API locally at http://localhost:3080/api/products. You should be able to see the JSON returned.
Before we do anything else we need to create a HOST environment variable. Open the .env.local file and add the following:
# add HOST
HOST=http://localhost:3080
We will use the HOST environment variable now, to prepend to our request to the API. Let’s update the index.js file in the pages directory and add the following (outlined in the orange comments):
import Head from "next/head";
import { Layout } from "../components/layout";

// Pass the products object to the Home page
export default function Home({ products }) {
  return (
    <>
      <Head>
        <title>Products</title>
        <meta name="description" content="Products" />
      </Head>
      <Layout>
        {/* Need to pass products.data to the Products component */}
        <Products products={products.data} />
      </Layout>
    </>
  );
}
// Add getServerSideProps so we can return the data from server-side
export async function getServerSideProps() {
  // Fetch data from external API
  const res = await fetch(`${process.env.HOST}/api/products`);
  const products = await res.json();

  // Pass data to the page via props
  return { props: { products } };
}
This will retrieve the products via a server side request so the page can pre-render. We now need a component to display this product information. To do this we will create a new javascript file called products.js in the components folder.
import React from "react";
import Image from "next/image";
import styles from "../styles/products.module.css";

export const Products = ({ products }) => {
  return (
    <>
      {/* Check that we have products */}
      {products.length ? (
        <ul className={styles.products}>
          {/* Iterate over the products */}
          {products.map((product) => (
            <li key={product.id}>
              {/* Note that we are using a form to post to the API we just created */}
              <form action="/api/checkout_sessions" method="POST">
                {/* Display the product image using the Next Image component */}
                <Image
                  src={product.images[0]}
                  alt={`Image of ${product.name}`}
                  layout={"responsive"}
                  width={0}
                  height={0}
                  priority={true}
                />
                <h2>{product.name}</h2>
                <p>{product.description}</p>
                <button type="submit" role="link" className={styles.link}>
                  Buy Now
                </button>
                {/* The ID of the product so the user can purchase */}
                <input
                  type="hidden"
                  name="priceId"
                  value={product.default_price}
                />
              </form>
            </li>
          ))}
        </ul>
      ) : (
        <div>No products</div>
      )}
    </>
  );
};
Notice in the above example we take advantage of the Next.js Image component. This component is great for displaying optimised versions of your images serving the correct sized image for the device/screen they are being served to.
We also need to create a CSS module for the product component, create a new file called products.module.css in the styles folder.
.link {
  display: inline-block;
  background-color: var(--primary-color);
  color: #fff;
  padding: 0.5rem 1rem;
  border-radius: 0.2rem;
  border: 1px solid var(--primary-color);
}
.link:hover {
  background-color: #fff;
  color: var(--primary-color);
}
.promotion {
  display: grid;
  grid-template-columns: 1fr;
  list-style: none;
  gap: 1rem;
  padding: 0;
}
@media screen and (min-width: 50rem) {
  .promotion {
    /* 2 columns */
    grid-template-columns: 1fr 1fr;
  }
}
@media screen and (min-width: 70rem) {
  .promotion {
    /* 3 columns */
    grid-template-columns: 1fr 1fr 1fr;
  }
}
The last step to get our images to display from Stripe is to update the next.config.js file with a parameter to allow us to retrieve the images from stripe.com. We can do this by adding the following:
module.exports = {
  reactStrictMode: true,
  // Add this to allow images to be retrieved from stripe.com
  images: {
    domains: ["files.stripe.com"],
  },
};
When loading the page for your shop locally you should now see a list of products available like the following:
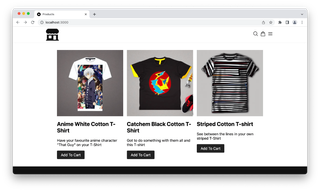
Our products are displaying now because we used getServerSideProps to retrieve the products server side. The product information is retrieved before rendering and served server side (information will be displayed even if JavaScript is disabled). Great for search engines to be able to index your products.
Next, we will add the cart and purchase functionality so someone could buy one of our products.