Build a shop with Next.js and Stripe
This article is part of a series, find the rest of the parts here:Concluding with the Next.js & Stripe online shop series we now will configure our shop to be able to purchase via Stripes hosted checkout page.
To do this we need to create a new API router to post the ID of the product we wish to purchase. In the pages/api/ folder create a new file checkout_sessions.js. Add the following to this file:
const stripe = require("stripe")(process.env.STRIPE_SECRET_KEY);

export default async function handler(req, res) {
  if (req.method === "POST") {
    try {
      // Check priceId has been provided
      if (!req.body?.priceId) {
        throw new Error("Price ID not provided");
      }
      // Create Checkout Sessions from body params.
      const session = await stripe.checkout.sessions.create({
        line_items: [
          {
            // Provide the exact Price ID (for example, pr_1234) of the product you want to sell
            price: req.body.priceId,
            quantity: 1,
          },
        ],
        mode: "payment",
        success_url: `${process.env.HOST}/success`,
        cancel_url: `${process.env.HOST}/canceled`,
      });
      res.redirect(303, session.url);
    } catch (err) {
      res.status(err.statusCode || 500).json(err.message);
    }
  } else {
    res.setHeader("Allow", "POST");
    res.status(405).end("Method Not Allowed");
  }
}
This function will only allow POST requests. It also checks to ensure that the request body contains the price ID for the product, before redirecting to Stripe requesting with our private Stripe key.
In the previous step we have a form with a price ID value that we can post to this new checkout_sessions.js API route.
On the product page we need to add the Stripe front-end library which generates a new shopping object. Let’s first install via the terminal:
npm install --save @stripe/stripe-jsOnce that’s been added we can then add the following to the index.js file to create a Stripe object. Make sure it sits outside the component for the page.
// import stripe js
import { loadStripe } from "@stripe/stripe-js";

// Make sure to call `loadStripe` outside of a component’s render to avoid
// recreating the `Stripe` object on every render.
const stripePromise = loadStripe(
  `${process.env.NEXT_PUBLIC_STRIPE_PUBLISHABLE_KEY}`,
);
We now need to create the following pages success.js and canceled.js to be added to the pages folder.
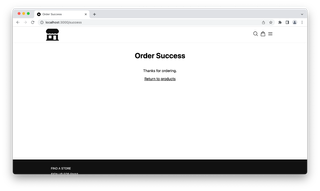
The success.js file will have the following:
import Head from "next/head";
import Link from "next/link";
import { Layout } from "../components/layout";
export default function Success() {
return (
<>
<Head>
<title>Order Success</title>
<meta name="description" content="Products" />
</Head>
<Layout>
<h1>Order Success</h1>
<p>Thanks for ordering.</p>
<Link href="/">Return to products</Link>
</Layout>
</>
);
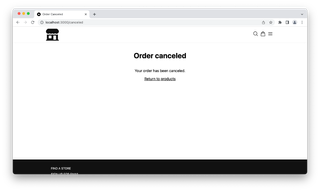
}The canceled.js will have the following:
import Head from "next/head";
import Link from "next/link";
import { Layout } from "../components/layout";

export default function Canceled() {
  return (
    <>
      <Head>
        <title>Order Canceled</title>
        <meta name="description" content="Products" />
      </Head>
      <Layout>
        <h1>Order canceled</h1>
        <p>Your order has been canceled.</p>
        <Link href="/">Return to products</Link>
      </Layout>
    </>
  );
}
In the checkout_sessions.js file we supply a success_url and a canceled_url value. This is where we redirect the user from the checkout page.
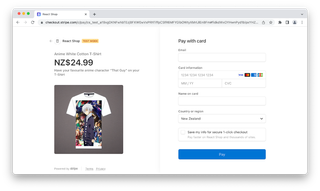
When you click on the “Buy Now” button you will be redirected to the Stripe checkout, like in the image below.
If you complete the purchase, then you will be directed to the success page.
Otherwise if you click the left arrow / back you will be redirected to the cancel page.
We have now completed the display of products and have the checkout page working correctly. Well done. 👏
You can checkout the GitHub repository for this project to see the finished result. Please note there are branches for each step. Alternatively you can view the repository on CodeSandbox.
For more help with setting up Stripe checkout take a look at the documentation on the Stripe website.