In this video I show you how to add an MCP server to an existing project. I’m using Kanbanana, a simple Kanban app with boards, columns and cards. You can drag cards around in the browser, but I wanted to be able to ask Claude to do that work too.
The opening demo is a good example. I ask Claude Code to add cards for the work involved in adding MCP to the project. It calls the server’s tools, creates nine cards in the To Do column, and gives each one a description. Refresh the browser and there they are.
Here’s how that connection works, and how to run the same example yourself. The Kanbanana source is on GitHub, with the finished server on the mcp branch.
What is MCP? #
MCP stands for Model Context Protocol. It’s an open protocol that lets AI applications discover and use capabilities exposed by another application. A compatible host can connect to your server rather than needing its own custom integration with every part of your app.
If you’ve watched my video on how coding agents work, the idea should look familiar. An agent has tools for reading files, editing code and running commands. Here we’re giving it tools for our application: read a board, create a card, move a card.
There are three parts to keep straight:
- The host is the AI application you’re using, such as Claude Code or Claude Desktop.
- The client is the connection inside that host. There is a client connection for each MCP server.
- The server is our code. It exposes capabilities over the protocol and carries out the requests it receives.
There is no AI model inside the Kanbanana MCP server. The host talks to the model, the model requests a tool, and the host’s MCP client sends the request to our server. The result goes back to the host so the model can use it in its next response.
That also means you can test the server without a model. The MCP Inspector can discover and call the tools directly.
Tools, resources and prompts #
An MCP server can expose three different things:
- Tools are actions the model can request. In this project,
create_cardadds a card andmove_cardchanges its position. - Resources are data a client can read and make available as context. Kanbanana exposes a board as readable Markdown at
kanbanana://boards/{boardId}. - Prompts are reusable message templates a user can select. The
triage_boardprompt asks for a review of a board and suggestions for improving its cards.
Kanbanana has eight tools, one board resource template and one prompt. How resources and prompts appear in the interface depends on the client. A prompt may be exposed as a slash command, for example.
Where the server runs #
This example uses stdio, or standard input and output. Claude Code starts the MCP server as a local child process and communicates with it through those streams.
The MCP server runs outside the application’s Docker containers. It calls the same REST API that the React frontend uses. The API handles validation, database access and transactions as usual.
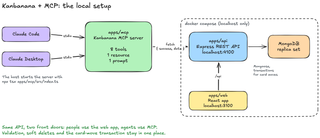
The diagram shows the overall arrangement. Use the full launch command below, including --conditions=development, when running the source from this repository.
The important choice here is that the MCP server never connects to MongoDB directly. I already have an API with the rules for creating, updating and moving cards, so the MCP layer uses it. That keeps the server small and avoids implementing those rules twice.
Remote MCP servers can use Streamable HTTP. This video stays with a local server; deploying a remote server and adding authorization are separate pieces of work.
Run the example #
You’ll need Node.js, npm, Docker with Compose, and Claude Code for the Claude demo. The MCP workspace is pinned to the Node 26.13.0 recording runtime. Select that version with your version manager before installing dependencies.
Clone the branch that contains the finished implementation:
git clone --branch mcp https://github.com/andrewjamesford/kanbanana.git
cd kanbanana
node --version
npm ci
docker compose up --build
Open localhost:3100 for the web app. The API runs on http://localhost:4100, which is also the MCP adapter’s default API URL.
You can create a board and columns in the browser, or load the optional sample board from a second terminal in the repository root:
docker compose exec api npm run seedThe host-side MCP workspace uses Node 26. The app’s Dockerfiles still use Node 22; running the MCP server locally does not upgrade those containers.
Connect Claude Code #
Run this from the repository root:
claude mcp add --transport stdio kanbanana -- npx tsx --conditions=development apps/mcp/src/index.tsThat gives the server a name, selects stdio, and tells Claude Code which command starts it. The development condition lets the shared package resolve to its TypeScript source without a separate build.
Open Claude Code in the project and use /mcp to check the connection and inspect the tools. You should see:
list_boardsget_boardcreate_boardcreate_columncreate_cardupdate_carddelete_cardmove_card
For example, ask Claude to add cards to your board for implementing an MCP server. It can find the board, read its columns and then call create_card for each task. Check the tool requests and your client’s permission settings before allowing changes.
Test without Claude #
The repository also includes an Inspector command:
npm run mcp:inspectUse it to inspect the available tools, their schemas and their responses. It’s useful when you’re debugging the server and want to call a specific tool without asking a model to choose one. The API needs to be running for board reads and writes.
The MCP README also has Claude Desktop setup instructions. Desktop uses the built server with absolute paths to Node and the entry point, after running the root npm run build.
Building the MCP layer #
The implementation lives in apps/mcp. The main files are:
api.ts: a small client for the existing REST API.server.ts: the server factory and the tool, resource and prompt registrations.move.ts: the card-ordering logic.format.ts: turns a board into ordered, readable text.index.ts: starts the stdio server.
This version of the project uses @modelcontextprotocol/server 2.4.0 and Zod 4. The client package used in tests is also pinned to 2.4.0. Those are the versions in this example’s lockfile, so use npm ci to follow along with the same dependencies.
The entry point is short:
import { serveStdio } from "@modelcontextprotocol/server/stdio";
import { createApiClient } from "./api.js";
import { createServer } from "./server.js";

const api = createApiClient(process.env.KANBANANA_API_URL);
void serveStdio(() => createServer(api), {
  onerror: () => console.error("Kanbanana MCP transport error."),
});
Keeping the transport outside createServer makes the server easier to test. Tests can provide a fake API client and use an in-memory connection instead of starting the real app.
Keep ordinary logging off stdout. It’s carrying the MCP messages. Diagnostics should go to stderr, as console.error does here.
The anatomy of a tool #
Each tool needs a name, a useful description, an input schema and a handler. This is the create_card registration from server.ts:
server.registerTool(
  "create_card",
  {
    description:
      "Add a card to a column. Use get_board first to find column IDs.",
    inputSchema: z.strictObject({ columnId, title, description }),
    outputSchema: z.object({ card: cardSchema }),
  },
  ({ columnId, ...input }) =>
    tool(async () => {
      const card = await api.createCard(columnId, input);
      return result(`Created card '${card.title}' (${card._id}).`, { card });
    }),
);
This is an excerpt from the factory, rather than a standalone file. The field schemas are defined earlier using @kanbanana/shared. The tool helper turns failures into readable tool errors, and result returns both text and structured data.
Notice the description says when to use the tool and where its IDs come from. “Use get_board first to find column IDs” gives the model a practical next step instead of leaving it to guess.
The schemas matter too. The API and MCP server share the same title, description and ID validation. If a title is too long, it can be rejected before making an HTTP request. There’s a detail to watch in this implementation: custom Zod refinements enforce the text limits at runtime, but those limits don’t appear as maxLength in the discovered JSON Schema. The field descriptions include them as well.
Tools can also carry annotations such as readOnlyHint or destructiveHint. Those help a client describe a tool, but they don’t enforce permissions or guarantee that a confirmation dialog appears.
Follow a request through the app #
Suppose I ask Claude to add a card called “Record intro” to To Do.
- The host has started the server, initialized the connection and discovered its tools.
- The model requests
get_boardto find the board’s columns and their IDs. It can uselist_boardsfirst if it needs the board ID. - The MCP server fetches the board from the REST API and returns readable text and structured data.
- Using that result, the model requests
create_cardwith the To Do column ID and the card title. - The handler posts to the API. The API validates and saves the card, and the result comes back through MCP.
That is what you’re seeing in Claude Code’s transcript when several tool calls appear one after another. Each result gives the model information for its next request.
Design tools around useful tasks #
Moving a card is the most useful example of why the MCP tools don’t have to match the REST endpoints one for one.
The browser already has the board, columns and cards loaded when you drag a card. The API expects a placement object containing the source and destination columns, plus the complete card-order arrays for both.
Asking a model to reconstruct those arrays every time adds unnecessary work and opportunities for mistakes. The MCP tool takes the smaller request: which card, which destination column, and optionally which position.
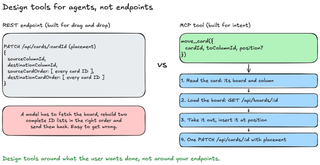
The handler does the rest:
- Read the card to find its current board and column.
- Read the board and check that the destination is on the same board.
- Remove the card from the source order and insert it into the destination order.
- Send one
PATCH /api/cards/:cardIdwith the completedplacementobject.
It also handles reordering inside a column. With illustrative card IDs [A, B, C], moving B to the beginning produces a reduced source order of [A, C] and a destination order of [B, A, C].
The tool accepts a final zero-based position. Omit it to append the card. The result uses a one-based position when describing the move to a person.
The final PATCH is atomic, but the reads before it are separate requests. That does not make the whole operation immune to concurrent edits. A production collaborative app needs version checks or another way to handle conflicting updates.
This is the part I’d carry into your own project: give the agent a tool for the task the user wants done, and let normal application code handle the bookkeeping.
Keep the local demo local #
This example has no authentication. Its Compose ports bind to localhost, and the MCP process runs on the user’s machine. Don’t expose that unauthenticated API to the internet.
For an app used by other people, the API needs to authenticate requests and enforce which data each user can access. Putting MCP in front of it doesn’t supply those permissions.
There are a few other boundaries to keep in mind:
- MCP doesn’t sandbox a server process. Only run server code you trust with the OS permissions it receives.
- Board and card text is untrusted content. A sentence inside a card is not permission to run another tool.
- The
triage_boardprompt asks the model to suggest edits and wait for agreement. That instruction is useful, but it isn’t an authorization system. - Destructive actions need appropriate controls in the host and application, not just a tool annotation.
Putting it to work #
At the end of the video, I ask Claude to move all the cards on the MCP board to Done. It lists the boards, reads the right one and calls move_card for each of the nine cards. Refresh the browser and they’re all in the new column.
The existing app still handles the data. The MCP server gives the agent a way to work with it through a small set of tools.
You can watch the walkthrough on YouTube or open the finished MCP implementation and try it with your own board.